 Photo via California Dingo
Every musician dreams of recording in a big, fancy studio with a world-renowned producer, but the honest truth is that most of us are getting by on a pretty tight budget. Fortunately, with a couple of easy hacks, some production knowledge and little bit of patience, you can get your home recordings sounding extraordinarily close to what a professional studio might deliver.
One of the biggest telltale signs that a track wasn’t recorded professionally is how the vocals sound, so I’m going to let you in on a few pro tips to nail your vocal tracks with the gear you already have at home.
1. Get in the zone
As obvious as it sounds, the first step to getting a good recording is to set the right ambience. If the vibe is off and you’re in an environment where you can’t relax, you’re already off to a less than ideal start. Once you’re feeling comfortable, make sure your headphone levels are nice and you’ll be ready to go.
2. Hack your bedroom
In order to accomplish a great lead vocal sound in a non-professional environment, it’s a good idea to record in a neutral, dry room. You’ll want to avoid cavernous rooms with reflections and reverberated sound because it will affect the quality and the control later in the mixing process. Keep in mind that there’s no way to go back to "dry" from a "wet" sound, so make sure the room has a controlled sound, leaning towards dry (not "dead" though).
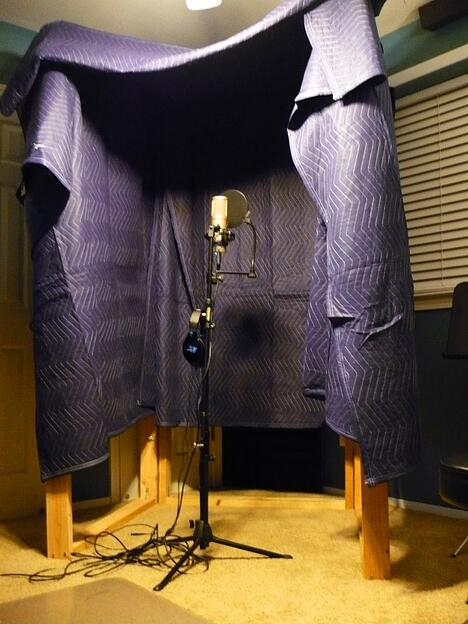
A bedroom works well because your mattress, blankets, cupboard and even curtains are all good sound absorbers. In any case, you can build a simple vocal booth using old blankets, curtains, mattresses and pillows. You could even add a few rough wood panels to create a more natural sound. Remember, the most important thing to avoid is those reflections and echoes typical of hard floors, empty rooms and large rooms.
3. Position your mic and pop filter correctly
Place the mic diaphragm facing your lips (sometimes off axis, if necessary). Listen with your headphones for the subtle differences. Try close (two or three inches) or mid-distance (one foot) mic’ing, depending on which sound works best for your track. Always use a pop filter in front of the mic to tame your “P” and “T” sounds. If you don’t own a pop filter, you can make one from scratch with a sock or stocking cap stretched over a wire hanger.
4. Get the right mic levels
After the mic warms up for a few minutes, quickly get the level into the preamp and on the DAW. Vocals should be safely below the red to avoid distortion from levels that are too hot (also known as “clipping” or “peaking”). Learn more about proper mic'ing techniques here.
5. Do several takes
Warm up singing through the entire song two or three times before going into detailed spots. Relax and have fun the whole way through – you’re making music, after all! Record everything and properly label all the tracks and takes for easy reference later.
If you’re not pleased with your performance after multiple takes, take a break and step away from the song. Sometimes overdoing it can put strain on your performance and your voice. Instead of letting frustration build, coming back to it with a fresh start the next day might be your best move.
6. Be careful with your vocal editing
Today’s software offers incredible control over recorded tracks for editing. If you have some experience with plugins and editing tools, that’s great, but don’t overuse them or become too dependent.
When you’re doing vocal comping, try to use big portions of a given take so that you don’t ruin the vibe and original nature of the performance. Fill in only the less solid parts from other vocal takes. Make sure you focus on the performance, not the pitch. Use parts that aren’t just sung “well,” but that also have personality.
Autotune and Melodyne are great tools, but don't overdo them (unless you’re intentionally going for that mainstream pop/artificial effects sound in the production). Only fix the faulty words or sections – don't put the tuning plugin on the whole track.
7. Know when (and when not) to process your vocal sound
Skilled engineers and producers have figured out how to achieve a convincing sound for vocals after years of experience and dozens of albums. While that level of experience can’t quite be replicated in your home recordings if you’re just starting out, there are many high quality plugins for DAWs nowadays that will allow you to get pretty darn close, as long as you have patience and a good ear.
For starters, you don’t need to use EQ if you have a really good preamp. If you’re recording jazz, folk or classical, do not use compression. For pop or rock, try using 2-4 dB compression and a slow attack (to preserve a more natural vocal sound), and see if you like it. Feel free to use hard compression to your taste and at your own risk!
A few effects plugins you may want to equip yourself with include:
- a good parametric EQ to cut unwanted frequencies and enhance others
- a couple of compressors
- a de-esser
- two or three types of delays (short, medium and long, to be used in different parts of the song)
- one or two high quality reverbs (short and long – again, to be used creatively throughout the song)
Play around with these effects and see how they influence the vibe of the song and the production. It’s all about experimenting until you find the right sound!
Do you have any tips for recording vocals at home? Let us know on