 Image via performermag.com
This article originally appeared on Performer Magazine.
Welcome to the wonderful world of music mixing! Your assignment today is to make everything sound great: huge drums, pounding bass, roaring guitars, thunderous synths, and captivating vocals. Sound easy? It's not. You'll know it's not that easy when you push up all the faders and instead of sounding like a radio hit, what you've got sounds like a tiny little… demo.
There are many factors that go into taking the raw tracks and unifying them into something polished, moving, and engaging. Today, we're going to talk about garbage (sonic garbage, not the band Garbage).
Sonic garbage comes in two forms:
- The low frequency rumble, noise, hum, whatever, that's always present in recorded tracks. The source may be the room, or an amplifier, or the output of a synth. Yes, even samples may have junk down there! When you put up all the tracks, all the gunk adds up, and makes a cloudy, messy low end. If your kick or bass sounds great in solo, but seems small or wimpy in the mix, likely it's getting stuck in the muck.
- The normal sound of the instrument, but the parts that you don't need. This is, of course, rather subjective, but if you're willing to cut away garbage sound, you'll allow other elements to shine. For example, electric guitars – particularly the more they're distorted – eat up the entire sonic spectrum. They can put out 100 Hz to 8 KHz, leaving no room for any of the other elements we listed above.
I'm sure you've had the experience of getting the drums, bass, and vocals to sound perfect, and then you bring in the guitars, and suddenly everything goes to hell. This is where style, taste, and genre come into play. You have to decide which elements are key in which frequency ranges. Much of that furious guitar isn't helping the song! Cut it away.
Filters are the simplest element of an EQ. You've probably spent some time with EQs before, boosting or cutting frequencies to shape your sound. However, it's likely you've overlooked the filter section that's often built into the more complex EQ. Often labeled High Pass Filter (HPF), this simple band has a slope that more or less steeply approaches –inf (minus infinity, aka no sound passing). This is the simple tool for cutting away the gunk.
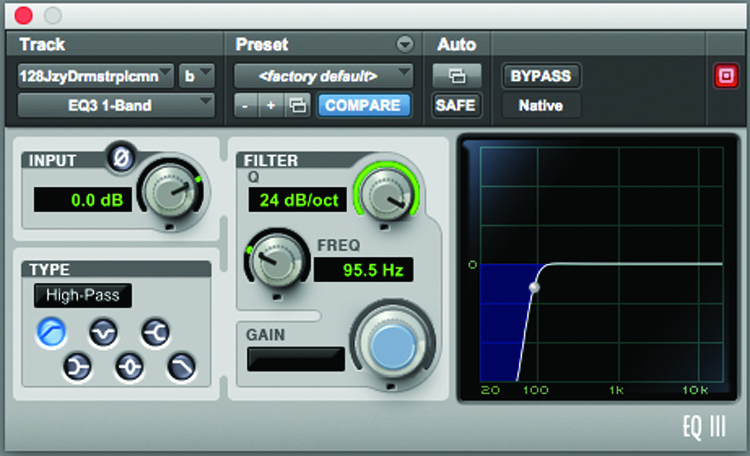
Generally for simple filters, I will use a plugin, even though I typically do most of my processing in the analog domain. For filters and other surgical tools, I just find plugins to be more precise. Pictured at the top of this article is a basic filter in Avid's EQ3 that I use often. Remember this isn't intended to augment the sound, but rather to transparently remove elements that are getting in the way.
Notice, first, that I've set the plugin to "HPF" using the button on the left shaped kinda like a square-root sign, but is actually a mini graph of the filter. Next, I typically turn the filter Q knob fully clockwise to 24 dB/oct. This makes the slope of the filter as steep as it can go. Sometimes you'll want a softer slope, but most of the time, a steep filter is good. In the analog world, steep filters can introduce phase shifts that can, themselves, muddy your work; properly designed plugins, however, avoid this issue.
Now we begin to cut. If we're looking to remove super low garbage from a kick or bass, aim really low, around 20 to 30 Hz. But wait, you say. No one can hear that low! A few of us can hear down there, but more importantly, the gear can hear down there – a speaker on which you or your audience listen will try to reproduce those frequencies, causing distortion. It will react to signal even if we can't hear it. For example, if you run that super low junk through a compressor later in the mix, you'll find that the compressor reacts to that super low stuff, not to the audio you want to affect.
With instruments that live higher in the spectrum, you can start to cut higher. I often start around 100 Hz. This works for guitars, vocals, snares, and synths. But here's the key: you've gotta do this by ear and with the whole mix going. If you do this in solo, you'll fool yourself! So turn it all on, and then slowly raise the frequency of the HPF until you just start to hear the instrument changing. Stop and roll it back just a touch, and there you have it: bye bye, garbage!
Now that the low frequency garbage is gone, let's think about the second type: the parts of the instrument that you don't need. First, we rolled off the low frequency on the guitars only until they started to change tone. Now, maybe we want to change their tone for the good of the song. At this point we have to consider what other instruments are sharing in the same sonic space and which are most important in each frequency range.
For example, maybe we rolled off the guitar to 200 Hz but the guitar is still crushing the snare, or fighting with the bass. Try rolling off the guitar up to 400 Hz. Did that kill the guitar or increase clarity? If it killed the guitar, you'll need to roll back down to 200 Hz and consider another band of EQ to carve a smaller amount away from the guitar at 400 Hz. These frequencies are just examples; you'll have to do this by ear.
Once you understand that it's the junk that leads to muddy mixes, you can see the solution. Grab your trusty filter, your most valuable tool, and carve your way to clarity.
Up next:
- 8 Best Free Mixing Plugins of 2015 (So Far)
- 4 Reasons Why All Musicians Should Know Basic Recording and Mixing Techniques
- Can You Fix It in the Mix? How to Handle Your Recording Mistakes
- The 4 Elements That Separate a Good Mix From a Great Mix
Award-winning mix engineer and producer Jordan Tishler runs Digital Bear Entertainment in Boston. With a large Augsburger designed mix/overdub room with SSL console and racks upon racks of analog outboard gear, tape machine, and gazillions of instruments, Tishler has credits including B Spears, JLo, Iggy A, MOTi, Justin Prime, SIA, and London Grammar. For more, visit digitalbear.com.


