 Image via gearslutz.com
This article originally appeared on performermag.com.
Here's the thing about compressors: they're not used for what you think they're used for! And how you think about using them fully determines the results you'll get from them. Most people are taught, or assume, that compressors are for controlling the level of a sound. In fact, that is why they were invented, as "auto-leveling amplifiers," but we've gone way past that application now, and frankly, track automation is probably better for that anyway.
Compressors are really used to change the tone or the waveform of the signal. So you see that this is not about level, but rather about the way an instrument sounds in the track.
The quintessential compressor has four knobs: threshold, ratio, attack, and release. There are many variations on this, but they're essentially the same. In fact, there are so many variations that I had trouble finding a good example. However, the stereotypical version, like the revered Avalon pictured below, has two large knobs: threshold and ratio, and two smaller knobs, attack and release.
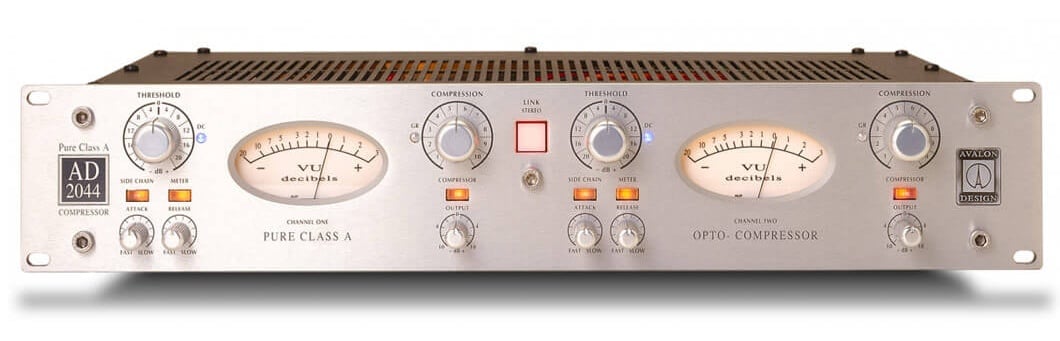 Image via performermag.com
A classic plugin like the Waves Renaissance Compressor, while using sliders, essentially draws your eye to the two big sliders in the center, threshold and ratio, while the attack and release are on smaller sliders at the top.
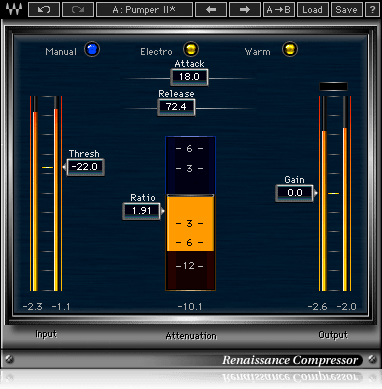 Image via performermag.com
Notice that the layout tends to reinforce that the key controls are the threshold and ratio. In fact, those may well be the first controls that you need, but are not the ones that require your greatest attention. Once you have the threshold and ratio set, you can practically forget about them. Where the magic really happens is when you start to adjust the attack and release.
The tonal shaping abilities of your compressor are best understood using an example. Let us consider the snare drum: any drum hit consists of a very rapid transient that's made by the stick hitting the drumhead, followed by a decaying tail that is the energy being transferred to the shell of the drum and the shell vibrating in a damped fashion. The interesting thing is that the very fast transient is so fast that our ear doesn't really hear it. However, when our playback system is set to play such a large burst of energy without distorting, the tail or body of the drum hit seems very quiet by comparison. To make the drum seem louder, or more importantly, more present, we need to change the relationship between the height of that transient and the body. We do this by adjusting the attack and release.
By adjusting the attack to a very fast setting, we are able to apply the compression to that early large transient. Then, by adjusting the release to something that is also very quick, we prevent the compression from being applied to the body. Now we've changed the relationship between the transient and the body of the hit, functionally making the body louder and changing the tone to emphasize the body characteristics of that drum.
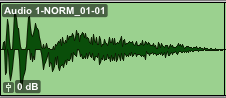 Image via performermag.com
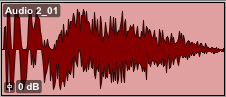 Image via performermag.com
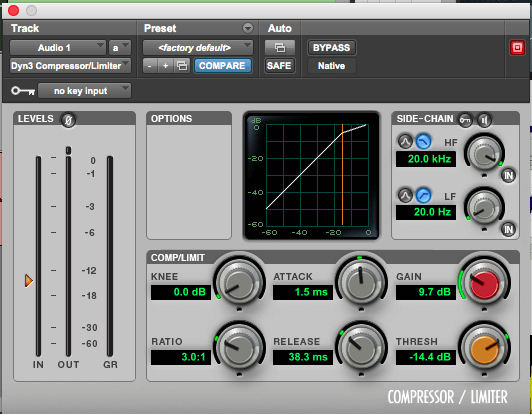 Image via performermag.com
We could, of course, apply the same scenario in reverse. If we have a dull and lifeless snare because it has no pop, we could apply the same compression but with a slow attack and the slow release to emphasize that initial transient. The fun, or the art, is in finding that sweet spot for both attack and release that balances the crack of the stick hit with the tone of the body.
Bass guitar is another instrument where this trick is handy. Most often, the bass feels a bit choppy if the bassist isn't really attuned to his or her dynamics. By applying compression with a medium attack to just let the finger or pick attack through, and then a medium release to contain some of the growl, but allow the distant tail to remain uncompressed, we can even out the note and give the track a fuller, more consistent feel.
Vocals often need compression – and often fairly complex compression. Remember that different compressors will differ in how well they handle certain sounds, and that compressing really hard with one compressor is usually not as effective as two machines working less hard. In pop music, often the vocal is compressed to hell. Typically, this means one compressor to shape the tone as we've discussed. For example, an Avalon 737 could be used with light compression, medium attack, and medium release to even out and thicken the performance, followed by a more brutal assault – say, with an LA-2A – to gel the track and get that "in your face" sound we’ve become so used to. (Notice that the LA-2A doesn't have attack and release settings at all, but uses the input knob to drive the circuit, creating the reduction, and the attack and release vary with the level of input and the amount of reduction).
Now that you know, forget about those threshold and ratio knobs: set them to get the machine working, but then dial in the tone with your attack and release. This is the stuff that makes tracks go from demo to hit!
Up next:
- 8 Best Free Mixing Plugins of 2015 (So Far)
- Cut the Crap: Why a Filter Is Your Most Important Mixing Tool
- 4 Reasons Why All Musicians Should Know Basic Recording and Mixing Techniques
- Can You Fix It in the Mix? How to Handle Your Recording Mistakes
- The 4 Elements That Separate a Good Mix From a Great Mix
Award-winning mix engineer and producer Jordan Tishler runs Digital Bear Entertainment in Boston. With a large Augsburger designed mix/overdub room with SSL console and racks upon racks of analog outboard gear, tape machine, and gazillions of instruments, Tishler has credits including B Spears, JLo, Iggy A, MOTi, Justin Prime, SIA, and London Grammar. For more, visit digitalbear.com.