Having your own mixer for your band can be a great way to control your sound if you’re playing a lot of events and want to have control in a place that may not have a dedicated sound person. The extra control means that you need to be able to set up and control it correctly.
1) How Many Channels Do You Need
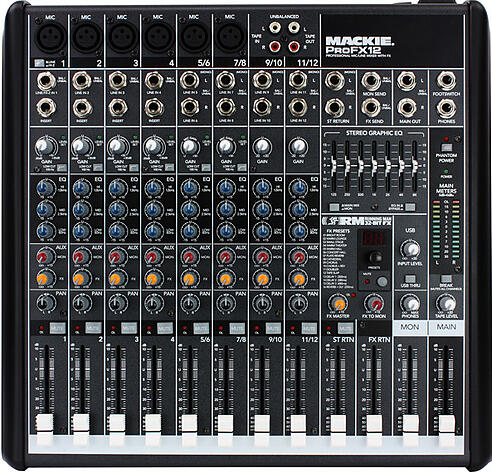
Think about how many mics and inputs you currently use with your group and add three more. That’s how many channels are a good idea for you to have on your board, though not absolutely necessary. The extra channels are for if you need a space for people sitting in with you or your guitar player adding a banjo for a couple of songs. Unused channels should be muted when not in use, but remember, you can’t add channels after you buy your mixer. Ideally if you’ve got a set line-up and stage plot, mark each channel by who uses each one using a label maker or permanent marker.
2) What Do All These Dials Do for each Channel?
First, start everything at 12 o’clock, so you have a centered start point. Gain controls the amount of the sound coming in from your mic or instrument. Your gain should be set so that the light just comes on (not a steady glow) at a peak sound. Setting it to regular sound and then playing harder could damage your board. Your EQ (equalizers) determine the level of each frequency. All the levels are important, but the focus for each instrument should be their specific ranges. For example, you’ll want to watch the highs on your guitar for when the guitar player plays a solo on the close end frets so he doesn’t pierce the eardrums of every audience member. Your AUX dials are for your monitor and effects. The effects should be kept to a minimum unless you’ve experimented at home and know EXACTLY what they will do for your board and your sound. Pan is for left and right, and should be kept middle. The slider at the bottom controls your sound outs to the amp. These dials and sliders, once set, should NOT be touched after your sound check.
3) What The Crap is Phantom Power?
This is just for powered microphones, like condensers, and active direct boxes. Make sure that it’s turned off unless you specifically need it. (Here is more information to help you choose which microphone to record with.)
4) What About All These Dials on the Side?
These dials control a variety of things like your monitor outs, a channel slider (you shouldn’t have one for a band mixer, only for DJs), FX controls (again don’t touch unless you specifically know what they do and how they change your sound), and your returns. You shouldn’t need your returns at an event gig. The most important thing to watch here is your main out meters. Set properly, they should be green, and just into the yellow at peak. This will provide the best output from the board to the amp without sending overblown sound.
5) Connecting to the Amp
Just like when you hook up your instrument, you can’t just use speaker cables to attach the mixer to the house system. You’ll need Balanced cables, whether they’re XLR or ¼ inch. Ideally, since unfortunately every venue is not the same, you’ll want to have 2 of both (left and right). Balanced cables are shielded against most outside interference and signal loss over distance. Trust me, you want them in your inventory before you start out, or you’ll be plagued by speakers with a ton of hissing and humming.
Lastly, be sure to test your board and plug ins before your first gig. Make sure that everything plugs in and works properly on a full system before you take it on the road.