Let's break down what each section of the Band Dashboard contains and how to manage your EPK.
When you first sign in to your Band Profile you will be welcomed by the Dashboard. The dashboard is a quick view of gigs you recently submitted to, a snapshot of all your gig history and upcoming calendar dates.
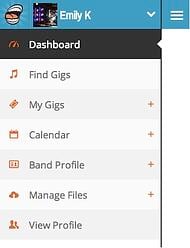
Tip: Click on the ![]() or 'hamburger" to collapse and expand the Dashboard menu on the left of your screen.
or 'hamburger" to collapse and expand the Dashboard menu on the left of your screen.
Going from top to bottom on the left side drop down menu, first up is Find Gigs. Right from your dashboard you can filter and search for the gigs you want. The advantage to searching for gigs when signed in to your Band Dashboard is most of the criteria that is required will auto populate, just make sure to double check that everything is correct.
To search for gigs, click on the "Find Gigs" tab in your dashboard. Click the blue arrow ![]() for a drop down to find gigs by type (live performance, licensing, etc.), genre, free to apply, and more.
for a drop down to find gigs by type (live performance, licensing, etc.), genre, free to apply, and more.
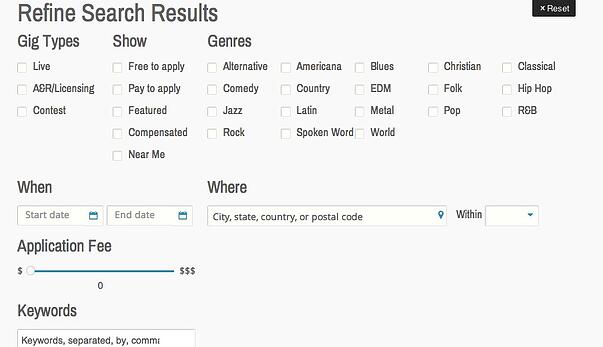
Click the gear icon ![]() to further refine your search. Set your own search criteria such as when, where and application fee.
to further refine your search. Set your own search criteria such as when, where and application fee.
Or you can search by keywords alone. Click on the magnifying glass on the right and a search bar will expand. Type a keyword of any gig you want to search for, line "NXNE" or "Winterfolk."
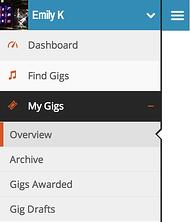
The My Gigs section of your dashboard expands when you click the orange plus sign.
This is where you will find your recent submissions, drafts, awarded gigs, and your gig archive.
My Gigs is also where you can check the status of any submissions if the promoter is using the Sonicbids submission tracker. Not all promoters use the submission tracker. Promoters will notify you if you are selected by email or phone so make sure your contact information is up to date.
Click on the orange minus sign to collapse the My Gigs menu.
Continuing down the line on the Dashboard Menu is Band Profile. Click Profile to access all your basic profile information such as:
- Profile Image (square image, at least 250x250 pixels)
- Membership Status (Active/Inactive) and Membership Type (Monthly/Annual)
- Band Name
- Vanity URL
- Genre
- Address
- Representations (Record Label, Union, etc.)
All of your social media for your band is also managed under the Profile section. Connect your Instagram and Twitter accounts so your profile stays up to date. You can also connect your Spotify and Rdio accounts.
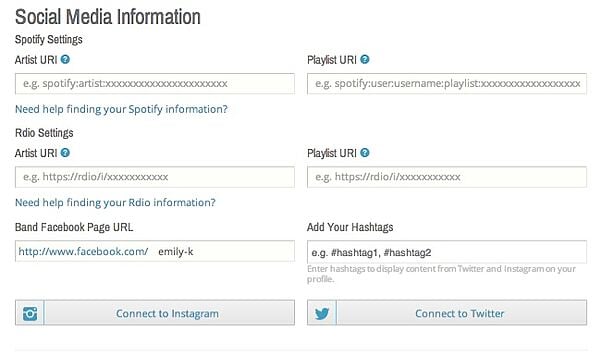
The most important change with the new Sonicbids Band Profile is creating your own unique hashtag for your profile. For example, if your band was called “Purple Pajamas” you would create the hashtag #PurplePajamasBand or something similar unique to your band. Tell your fans to use that unique hashtag, or you might end up with a bunch of pictures of purple pajamas in your profile instead of fan photos or your own photos.
Tip: Don’t tweet or share something you do not want a promoter to see. You are always representing yourself.
Also under the Profile section you can edit the following, just scroll down on the page:
- Band Bio
- Short Description
- Discography
- Set List
- Lyrics
- Press Reviews
- Band Members and Roles
- Stage Plots
To add or edit your media such as your photos, songs, and videos click on Manage Files to expand the dropdown.
Tip: Add titles of all your media. Once you upload your media make sure to edit the titles, the title will display on your profile.
Last on the list under the Band Dashboard is the ability to View your Band Profile. Click on the "View Profile" button to see the edits you have made.
For more information on how to navigate your account please check our out FAQ or chat with us by clicking "contact us" in the bottom right hand corner.