 Image via pixabay.com
This article originally appeared on Landr.
Drums are the bones of your track: they support everything. You want them to be punchy and to cut through. You want them to be loud without clipping. But you don’t want to sound like everyone else out there, do you? That’s what I thought.
A vital skill any producer needs is to know how to make drums sound unique. Follow this simple guide to making drums that stand out. Your track will get added character and you’ll never make boring drum sounds again.
Three is the trick
The idea here is to blend three different drum kits to make one badass percussion pattern. Sounds like too much? If you apply the right filters to carve a space for each kit, it will work.
- Kit number one is your main drum pattern.
- Kit number two supports the high end. We’ll give it a high-pass filter that lets through only the high frequencies.
- Kit number three adds some mid and low end. We’ll throw on a low-pass filter. It lets only the low frequencies pass through.
The last trick is to play with the mix. Your main kit will be the loudest. The levels of the other two kits are mixed lower.
Now let’s make this happen!
Drum track 1: your basis
Okay, first drum track: this will be your main beat.
Start by setting your master tempo. I’m making a slower hip-hop jam, so I set it to 105 BPM.
 Image via blog.landr.com
Choose a drum kit and drag it on a MIDI track. I use the 808 Classic kit in Ableton. You can use any DAW and kit that you prefer. Click on the first clip to open up your MIDI editor.
 Image via blog.landr.com
Write your beat in the MIDI editor by double-clicking where you want a sound. Kicks, snare, toms, maracas, whatever rocks your boat.
 Image via blog.landr.com
Hit play on your clip to listen to your drum loop. Add or remove elements in the MIDI editor until it sounds right.
 Image via blog.landr.com
The main beat sounds like this:
Drum track 2: your high end
Now it’s time to make the high end more fun with a second drum track.
Duplicate your first drum track (press ⌘ + D on Mac/CTRL + D on PC).
 Image via blog.landr.com
Select a different drum kit and drag it on this track. This will keep the MIDI pattern you wrote and change only how it sounds. I used the Kit-GrainBeams from Ableton’s free Designer Drums pack.
Go into the MIDI editor and delete some elements. I’m keeping only the snare and low tom.
 Image via blog.landr.com
Add a high-pass filter (HPF) on your track from the Audio Effects. In Ableton it’s called "Auto Filter."
 Image via blog.landr.com
Select the second icon to get a high-pass filter. Adjust the curve.
![]() Image via blog.landr.com
Image via blog.landr.com
Drum pattern number two has a cool metallic robot texture. It sounds like this:
Drum track 3: your low end
Now let’s make the low end punchier with a third drum track.
Duplicate drum track number one (press ⌘ + D on Mac/CTRL + D on PC). Place it third to keep things organized.
 Image via blog.landr.com
Select a different drum kit than the two other tracks. I chose Kit-DMX Tightdope. It’s another Ableton kit that comes with the free Drum Machines pack.
Edit your pattern in the MIDI editor. I actually kept the pattern exactly the same as the first drum kit:
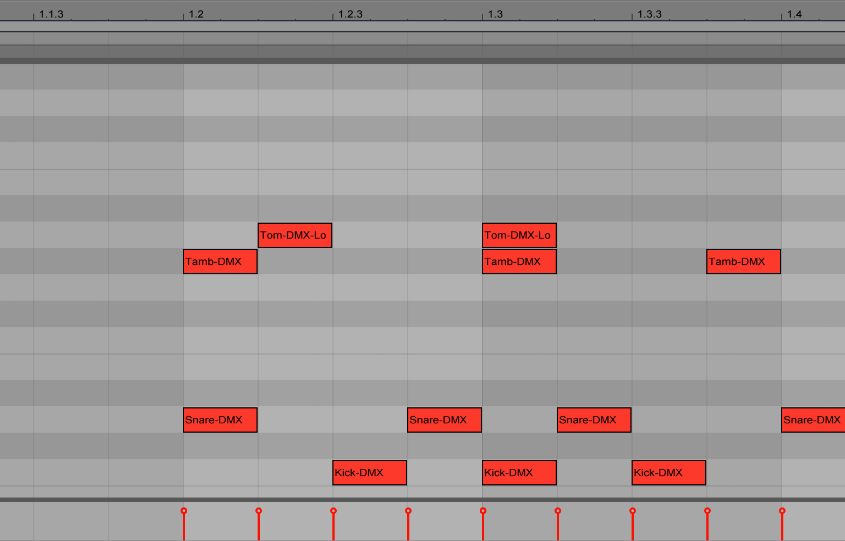 Image via blog.landr.com
Add a low-pass filter (LPF). Just like for the HPF on track two, go into Audio Effects and drag an Auto-Filter on track three. LPF is already selected – it’s the first icon. Adjust the curve.
 Image via blog.landr.com
This third drum kit adds some punch. Here’s how it sounds:
Listen, solo, mix
The crucial last step is adjusting your mix. That’s what will make your three drum kits sound like one. It’s always good to mix as you go. Especially if you notice that your levels are too close to 0 dB.
As we’ve said in another post: use your ears and your eyes. Listen but also look at your level meters.
Leave some headroom. Make sure your master fader isn’t too close to 0 dB (the last step in the level meter), or worse, in the red (too high!).
For this example, here’s how to mix it:
- Drum track 1: your fader slider should be between -12 dB and 0 dB.
- Drum track 2: turn the slider down to -12 dB.
- Drum track 3: turn down the slider even more, between -12 dB and -24 dB.
- Turn down the master to around -6 dB (it gives LANDR room for mastering).
The levels look like this:
 Image via blog.landr.com
Hot tip: Solo the kick drums on all kits. Play the kits together. This will allow you to hear if they fit nicely together. If it’s not quite right, tweak their pitch, volume, decay, etc. Don’t forget to remove the solo at the end!
 Image via blog.landr.com
And, finally, this is what our layered drum beat sounds like (after mastering it):
Why just use one kit when you can use three? The benefit of layering drum kits is that you get a truly unique and full sound. The more the merrier! The key is using filters and mixing properly to avoid an overloaded muddy mix.
Have fun with it! Go weird, go wild! Is there a better feeling than getting that perfect drum pattern?
Next up: 4 Tips for DIY Drum Recording
Leticia Trandafir is a DJ and music maker with a love for 303 basslines and hangouts at the library. Content creator at LANDR.