
A vocal chain is essentially a chain of effects you process your vocals with. Some of these are inserted directly on the audio channel strip while others are placed on return channels which you send the vocals to.
Therefore, a vocal chain usually implies a combination of direct and parallel processing.
While many DAWs come with templates and presets designed for vocals, finding the right combination of effects takes some trial and error.
For one thing, most singers prefer a vocal chain that makes them feel confident in the booth. But more of then than not, one that works perfectly at a recording session will not be sufficient to get the job done at the mixing stage.
On the other hand, some producers load up whatever they can think of on a vocal chain when they’re about to embark on a recording session in an effort to reach the end result more quickly.
But track vocals with a chain that has one too many compressors on it and you may inhibit the singer’s dynamic and emotional approach to their performance. Don’t give them enough reverb, and they might just struggle to get in the mood.
While there are no hard and fast rules when it comes to building templates, it never hurts to keep efficiency in the forefront of our minds.
As a singer who records and mixes her own vocals, I’ve been through sessions that I’ve run myself as well as those that were run by others. After years of trial and error, I’ve come up with some rules that I now live by.
Recording
Your vocal chain for recording should be lighter than the one you use for mixing.
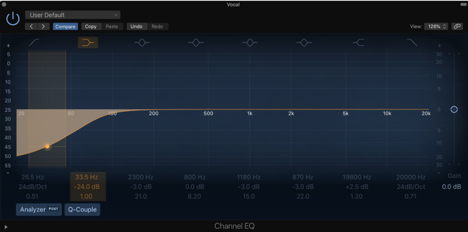
- If you’re happy with how your microphone sounds, you shouldn’t feel the need to make any EQ adjustments other than applying a low cut filter at the recording stage.
- If you’re looking for some subtle tone and dynamics enhancement, a slow acting, low ratio compressor will do. This is the perfect time to try out some of the presets available to you, since most vocal compression presets are designed to act in a gentle manner.
- A combination of a room and plate reverb with a slap delay will help your singer get in the mood. My advice? Go through the options in your library and pick your favorites! If you have a pre-recorded raw vocal in your hands, you can use it for guidance.
Mixing
When you’re done comping and editing your takes, have a separate vocal chain at hand that’ll give you a head start during your mixing process.
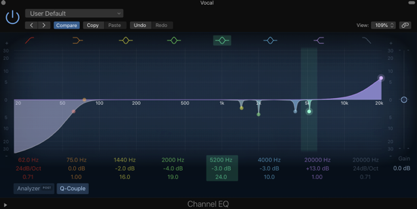
- Finish the subtractive EQ adjustments and follow up with additive EQ for tone enhancement.
If you struggle to find those annoying unwanted frequencies that come around every now and then, focus on improving the overall tone instead.
For instance, most pop and EDM arrangements require bright vocals, so it might not be a bad idea to boost the 10kHz-20kHz frequency range a little.
And if you already have lots of activity in the low to midrange frequencies in the instrumental, it might be best to relieve those frequencies either in your instrumental or the vocal mix, so that they don’t fight each other.
Pro tip: don’t follow EQ cheat sheets so religiously to the point where you inhibit yourself from developing your own taste!
- Insert a de-esser.
Yes, it’s that simple! Most de-essers come with a default preset, so as soon as you insert one on your channel, you should hear a difference.
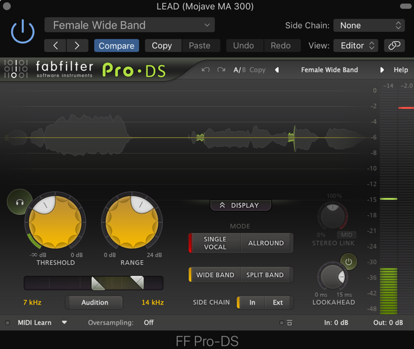
If you’re curious and want to improve your skills, then by all means, feel free to tweak those knobs, but remember: de-essers understand the language of frequencies and decibels just like EQ, noise gate and compression plugins do. Push your de-esser far enough and you’ll end up sucking the life out of your vocals!
- Instead of working with one compressor, try working with at least two to even out the attacks and transients in the vocal performance.

The first compressor I insert on the vocal channel catches the initial loud points of every syllable. To tame them, I bring the attack and release knobs in the compressor almost all the way down. The knee is usually somewhere between hard and soft, and my ratio is set to at least 5:1.

Then, I take care of the tails of each note I sing, so that they’re never lost in the mix. I insert a second compressor on the same channel and turn up the attack and release knobs in order to make the compressor act more slowly. The ratio is usually at around 2:1 on this one.
Finally, I open up both compressors and listen closely to make adjustments on the Threshold knobs in both according to my taste!
- Consider parallel compression to add more body and presence to your vocal mix.
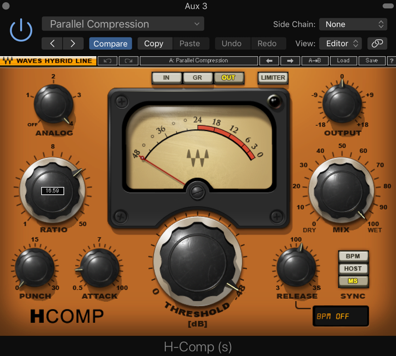
The key to applying parallel compression correctly to your vocal mix is to not be afraid of pushing the compressor you put on the return channel over the edge.
Make it aggressive enough so that you hear your vocal completely squashed and saturated when you solo the return channel.
- Apply a series of reverb and delay plugins to create layers in the ambience surrounding your vocals.
One of the biggest mistakes beginners do when they get into mixing vocals is expecting too much from one single reverb or delay plugin.
Don’t be afraid of experimenting! In fact, experiment with inserting multiple reverbs or delays on a single return channel as well as putting them all in their separate individual channels to observe the differences.

Set yourself up for happy accidents and you might just build the vocal chain of your dreams with what you have available to you! If you work with a professional DAW, you probably already have all the tools you need to make it happen.
***
SIRMA is an independent singer, songwriter and producer. She’s the creator of the Modern Pop Vocal Production course on Soundfly and has a degree from Berklee College of Music.