 Image via akustikkumas.net
If you've hung around any recording forum long enough, you can't help but notice the emphasis on room treatment – and with good reason. All the high-end gear in the world won't prevent it from being hard to mix and even potentially record in a room that's plagued with acoustic issues. Knocking this problem down can not only be a major game changer, but can also make for a solid dent in your pocket.
If you're looking to make a commercially viable space, consulting an acoustician should certainly be a consideration. For a home studio, however, the thousands to even tens of thousands of dollars that a consultation and treatment solution can cost is prohibitive. The good news is that with careful planning, some reading, and some handiness with power tools, your solution is only a weekend project away. I've seen and tried several different designs and materials, and this one definitely sees the best bang for your buck shy of spending upwards of $500 per panel.
Materials you'll need
To build some basic absorbers, you'll need the following:
- Owens Corning 703 fiberglass panels or Rock Wool insulation – this will be the material that's doing the "work" of the absorbing. The fiberglass is an industry standard, but if that's hard to come by or out of your budget, Rock Wool has similar acoustic properties and is also fire resistant. Some people look down on the latter as a solution since care must be taken when working with the Rock Wool; the resulting dust and fibers can be hazardous to breathe. Therefore, trying to keep the pieces as whole as possible, minimally handled and properly encapsulated, is key.
- 1x3 boards or similar size, depending on material to be framed – decent quality pine is fine, as the boards will be covered. They'll be cut to size as needed to frame the pieces of fiberglass/Rock Wool, or for where you've determined you'll be placing absorbers.
- Brackets – to potentially help reinforce the frames depending on size and weight, and some for mounting the frames to the wall/ceiling as needed, long enough to allow you to mount them away from the wall.
- Fabric for wrapping – whatever color/pattern you're interested in, go nuts. The thickness of the fabric is more important than the specific finish. You want something that's going to allow air to move freely through it, otherwise your absorber may reflect more high frequency energy than it absorbs. You can test this by simply blowing through it and seeing if you can feel it on your hand on the other side.
- Wood screws
- Wall anchors
- Tape measure
- Cordless drill/impact driver
- Saw (or see if your local hardware store will pre-cut boards to length for you)
- Staple gun and staples to affix fabric to frame
How to do it
Once you've gathered all your materials and planned your locations, you can begin:
1. Cut boards to appropriate lengths for desired frames as measured (if not already done).2. Assemble frames for the desired absorbers, driving screws through the edges, and reinforcing with corner brackets if desired.
3. Cut fabric to match, leaving enough material to fold over the back of the panel. (Leave more than you may need, as you can always trim later.)

4. Lay frame on top of fabric, and then place fiberglass panel or Rock Wool into frame. The frame should fit snugly, but not compress the material, as this will reduce the effectiveness of the panel.

6. Continue assembling absorbers until you've finished the lot.

7. At this point, you're ready to start mounting the panels. You may wish to take a moment to roughly place the panels to test out your final placement. There's no harm in moving them around as needed and making sure that the panels are having the desired effect before you commit to where you mount them. Don't be afraid to try and move things a foot to the left, a foot to the right, and see how it changes things.

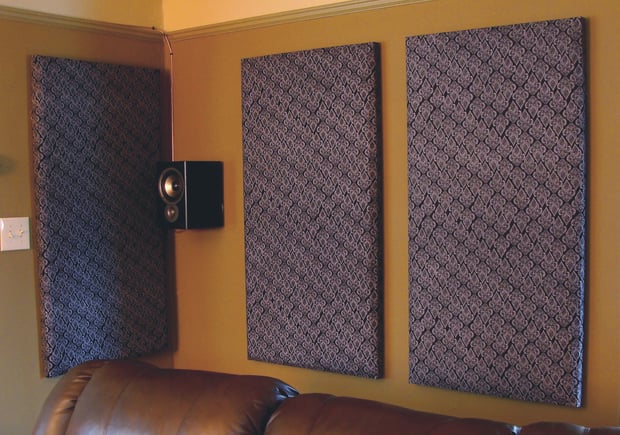
8. Once you’re ready to mount, it's important to make sure you leave a gap almost equivalent to the thickness of the absorber material itself, between the absorber and the wall. This will allow the panel to properly do its job. Simply surface mounting the panels will not allow them to be nearly as effective as they will be with this air gap behind the absorber.

At this point, you should be able to sit back and enjoy the fruits of your labor with an improved listening environment – and enough pocket change left over to celebrate with the beverage of your choice. Adapting these basic concepts to suit your own unique needs should get you one step closer to maximizing the potential of your space, without breaking the bank. Cheers, and happy music making!
Aaron Staniulis is not only a freelance live sound and recording engineer, but also an accomplished musician, singer, and songwriter. He has spent equal time on both sides of the microphone working for and playing alongside everyone from local bar cover bands to major label recording artists, in venues stretching from tens to tens of thousands of people. Having seen both sides at all levels gives him the perfect perspective for shedding light on the "Angry Sound Guy." You can find out more about what he’s up to at aaronstaniulis.com.