 Image via Shutterstock
Many bands that are new to the studio take a hands-off approach, standing back while a studio engineer sets up mics and obtains sounds. How many of us have heard something strange on the studio monitors and thought, “He’ll probably fix that in the mix”? Then there are those of us who, to reduce cost or gain creative control, have built our own studios and recorded ourselves. Often, these makeshift facilities use somebody’s borrowed home or apartment, or set up in a business that’s closed for the weekend.
Whether we’re the engineers or the engineer is working for us, the band just won’t sound right without reasonable mic placement. Here are a few tips, in order of operation.
A single room or isolation?
In the ideal studio setting, each instrument will have its own space, isolated from the other sound sources in the band. “Bleed” is the term we use to describe other sound sources intruding into an instrument’s recording, like when guitars are audible on the drum track. Even in pro studios, bleed is often evident on vocal tracks, because you can hear the tinny sound of the singer’s headphones in the vocal mic.
You can either take steps to reduce bleed or make it work for you. If you have multiple rooms, then amplifiers can be in their own spaces while the drums have a room to themselves.
Of course, if you choose the isolation method, you’ll need headphones for everyone in the band, so you can stand in the room with your drummer and hear your amps. Alternatively, if you have a control room with monitors and a window, guitarists and bassists can stand in the control room and still have eye contact with the drummer. This, again, is ideal, because you don’t have to worry about bandmates’ clothing rustles, coughs, or floor creaks showing up on the drum track.
If you’re playing in the room with the drummer, you should be standing on carpet to reduce these noises, and everybody needs to be well clear of any drum mics or cables. And no matter how badass that last take was, don’t yell out, “Hell yeah!” until the cymbals stop ringing.
If you don’t have a mile of headphone extenders or a number of connected rooms, find one big room, record yourselves live, and live with the bleed. But even in these cases, it’s a much easier proposition to track the vocals later in the same room. It’s very difficult to get a perfect vocal take, and a perfect vocal sound, with the entire band blaring on.
[How to Soundproof Your Home Studio or Rehearsal Space Like a Pro]
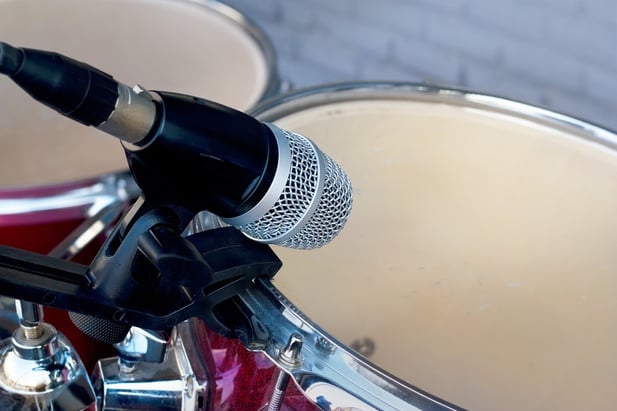
Mic placement on the drums
How many mics does it take to get a good drum sound? Well, you can do it with one – if that one is a nice stereo condenser, you find just the right place to put it, and the room sounds fantastic. But then you’ll have no options for mixing.
To have anything to work with in the mix, you’ll at least want to be able to work with the kick drum, snare, and hi-hat individually. So you need three good mics. The kick drum mic should point directly at the head (or at the sound hole in the front head on the drum) from about three inches away. You can also experiment with this mic two inches inside the drum.
Microphones for the snare and hi-hat should be pointed down at the top hat, and the head of the snare, respectively. As with the bass drum, they should be placed about three inches away. Be sure that the set is stable, and that the kick drum won’t move and crash into the microphone (because drummers hit a lot harder during songs than during soundcheck). Mics, mic stands, and mic cables should be arranged so they don’t contact any part of the drum set or each other!
If you have the mics, two condensers crisscrossed over one another in an "X" pattern will give you the high end, and a true cymbal sound. These should be up high, and sound great when suspended from the ceiling rather than placed on stands. If you’re working in a borrowed space and can’t drill holes in the ceiling, you can cut the toes out of a couple of old socks, thumbtack the socks to the ceiling, and hang the mics from them, creating “sock mounts.”
For toms or other drums on the set, individual dynamic mics, placed with their diaphragms three inches from the heads, are the way to go. Having lots of mics works best in a large room. If you only have three, and don’t want to lose those rack tom rolls in the mix, consider recording your drums in a smaller room to make the bleed work for you. This way, the reflections of the toms will work their way into your other three mics at a decent volume.
[4 Tips for DIY Drum Recording]
Guitars
A guitar amp is a much simpler source than a full drum set, and it’s perfectly possible to get a great guitar sound with one mic on one speaker. Don’t point that mic directly at the center of the speaker cone; aim it at a point halfway between the center and the edge of the speaker.
Staying consistent with your drum mic strategy, about three inches away from the cone is a good distance. However, three inches from the speaker is (hopefully) not where your ears are when you play. To add depth to that guitar tone and duplicate the sound you hear when you’re playing, place a second microphone about eight to 10 feet from the cabinet and the height of your head. Having these two radically different tracks will give you options when mixing, so you can find the right balance of clarity, depth, and power.
Recording an acoustic guitar? There are several sweet spots. Using a two-mic method, point a dynamic mic straight at the guitar top near where the neck joins the body and below the sound hole. Point a second one directly at the twelfth fret on the neck.
For a bassier, more percussive sound, point one mic at the guitar's body, near where your fretting hand rests. Never stick a mic into the guitar's sound hole (as amateur sound people are always doing at coffeehouse open mics); this leads to overwhelming feedback and uncontrollable low end.
[The Foolproof Method for Recording Acoustic Guitar That You Need to Know]

Bass guitar
Do you plug your bass into a direct box onstage? If not, you shouldn’t be plugging straight into a mixing board in the studio. Bass amps and cabinets are an important part of tone, and the bass cab should be mic’d like your guitar amp is. But low-frequency sounds call for low-frequency mics. If you only have one of these, and you’re playing live, save it for the bass guitar and use a regular dynamic mic (like a Shure SM57) on the kick drum.
Keyboards
Many keyboardists prefer to plug straight into a mixing board, but for rock applications, hearing these tones through speakers makes them sound live, gritty, and immediate. You can always do both. Run the keyboards direct to the board, but also through PA or bass speakers, and mic those. Then, as with the guitars, you can mix the two until your sound sits perfectly with the other instruments.
Experiment!
As with any creative endeavor, studio rules are made to be broken. Find strange old mics, weird-shaped rooms, and unusual techniques, and see how they work! But when you find that unique recording recipe, take notes so you can replicate it on demand. That one weird tone could become a key part of your sound.
[How to Break the Rules of Mic Placement for Better Recordings]
Jesse Sterling Harrison is an author, recording artist, and part-time farmer. He lives in Massachusetts with his wife, three daughters, and a herd of ducks.