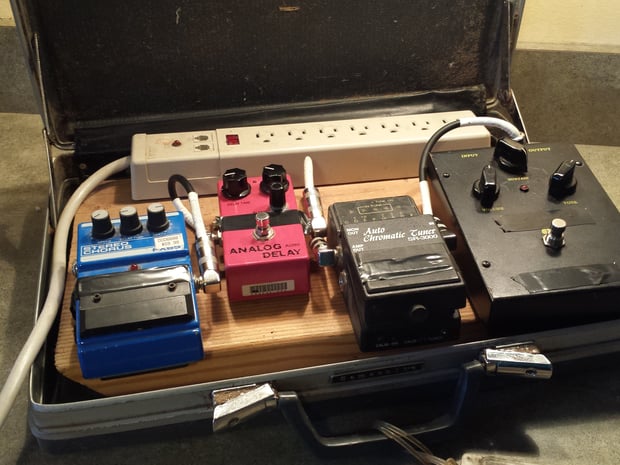
 Photo by Jesse Sterling Harrison; used with permission
Maybe you’re an old-school guitarist, and the only things you need are a guitar and an amplifier. All your tone comes from your fingers, just like your first guitar teacher said. That’s great; you’ve got a simple traveling rig. But for the rest of us, those who have discovered two or three (or six or seven) stompbox pedals that have become integral to our sound, packing is a pain. We’re carrying duffel bags that feel like they’re full of small rocks, or else we’re stuffing the open backs of combo amps with pedals and short cords, hoping they don’t stick to our speaker magnets (and that we won’t touch a hot capacitor and fry our hair while reaching for them).
These pedals need to be kept together, they need to always have power, and they need to be protected from the rigors of the road. We also wouldn’t mind if our setup time were cut in half. Well, here’s a quick hack that solves all those issues in one swoop. As with most DIY projects, you’ll need a drill driver with a couple of drill bits and a screwdriver bit, some sandpaper, and some sort of saw – electric or hand-powered.
1. Find yourself a briefcase
Briefcases are great thrift-store finds, and your grandparents probably have one in their attic that hasn’t seen action since Grandpa stopped selling encyclopedias door to door. They also double as hard cases for road-warrior musicians. They latch (and usually lock as well) and are generally the right size to fit four pedals and the other pieces we’ll be using in this mod.
Once you’ve found one, remove the soft liner to give yourself some more air space. Then, make a stencil and spraypaint your band’s logo on the outside. If you have any handcuffs, it would also be pretty punk rock to attach one end to the handle and the other end to the wrist of your toughest band member.
2. Select your pedals, a piece of scrap wood, and a power strip
You’ll need a thin but strong sheet of wood (half-inch plywood is usually perfect). Measure carefully and cut it to fit pretty tightly inside the briefcase using a jigsaw, handsaw, or whatever you have that cuts wood. As with any rough-cutting wood project, take a little sandpaper and smooth all the edges so you don’t get splinters. Splinters are not good in guitar-playing fingers.
Next, grab a power strip with enough outlets for all the pedals you’re about to put inside. The best power strips for this project have tabs at each end with pre-drilled holes so you can screw them down onto the board. The other type has holes on the underside so they can be placed over preset screws and then slid into place to lock. That can work too, but isn’t as secure.
The pedals you use should have their original chargers and not be too tall to fit inside the briefcase. If they have rubber feet, you can take those off with a screwdriver, which will give you some extra clearance.
Now, put your sneakers on and empty out your change jar. It’s time to take a trip to the hardware store.
3. Get longer screws with the correct threading
Remember those rubber feet on your pedals? Most of those are screwed into place. Take those screws with you to the hardware store. You’ll be replacing each of them with new ones that have the same thickness and the same threading, but the new ones need to be about half an inch longer than the ones you have. Grab two more screws to secure the power strip to your board, and you’re all set.
4. Attach pedals to the board
Once you’re back home, secure your pedals to the board, making sure the briefcase can still close (and making sure to leave space for short guitar cords to plug one pedal into the next). How do you make sure all the holes line up? Just find some wax paper or other translucent paper and trace the locations of the holes on each pedal. Then tape that paper to your board and drill guide holes right through the dots on the paper! Now you can attach your tuner, delay pedal, and distortion box in the correct order.
Connect them up with cords and plug the power supplies of your pedals into the power strip. If the briefcase is deep enough, these can stay plugged in when you close the case. Now you’re done!
If everything fits right, you should now be able to simply put your briefcase on the floor, open it, plug in a guitar, and connect to power – no more fiddling with each pedal, hoping the 9V battery inside still has a charge, hunting for cords to connect everything, and then tripping over all those cables on a dark stage. You’ve also made your stage rig more portable, more trouble-free, and much more damage-resistant, leading toward what all musicians are looking for: smoother shows.
Next up: The Guitarist's Guide to Building a Formidable Pedalboard
Jesse Sterling Harrison is an author, recording artist, and part-time farmer. He lives in Massachusetts with his wife, three daughters, and a herd of ducks.


